
Go provides a very effective means of executing HTTP requests, exposed through the net/http package. In certain scenarios, it may be favourable to provide recovery mechanisms that allow Go applications to function as normal in the event of HTTP connectivity failure.
Assuming the following process flow:

Application with dependency
Our Go application has an explicit dependency on System 1. Let’s assume that communication between both systems occurs over HTTP, and that our Go application must be highly available; in that it must remain functional if downstream systems fail:
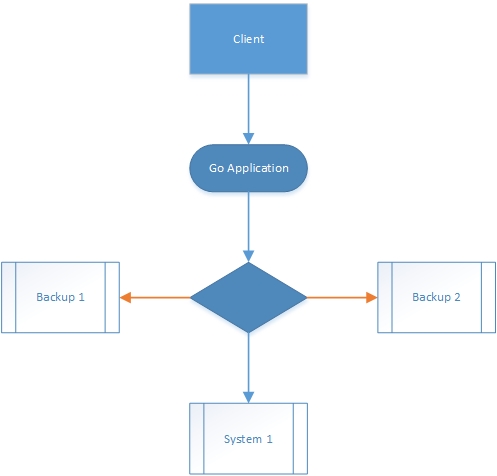
Application with fallback dependencies
Now we must configure our Go application, in the event of System 1 failure; to automatically attempt to repeat the failing HTTP request to Backup 1.
Similarly, should the connection to Backup 1 become unavailable, our Go application should attempt to repeat the failing HTTP request to Backup 2.
Chain of Responsibility

Chain of Responsibility
The Chain of Responsibility design pattern provides a suitable solution. The pattern defines a series of handlers, each one designed to execute a specific task. The task is passed along the chain until a handler successfully completes the task, or all handlers fail to complete the task.
Package fallback is designed to achieve this pattern, and to provide redundancy in the event of connectivity failure. The process flow pertaining to the above example is as follows:

Fallback process flow
Builder

Builder Design Pattern
Package fallback handles the execution of HTTP requests by wrapping each request in a ConnectionBuilder, as per the Builder design pattern. This allows the developer control over the manner in which underlying HTTP requests are constructed. Each ConnectionBuilder controls an underlying Connection – a wrapper for the actual HTTP request.
Each HTTP request is wrapped in a ConnectionBuilder, and managed by a ConnectionManager – the Director component. Once the Chain of Responsibility has been established, the ExecuteHTTPRequest method is executed on the first underlying Connection. This method will attempt to successfully execute the underlying HTTP request. Should the request fail, the method will invoke the ExecuteHTTPRequest on the next Connection in the chain, in a recursive manner, until any given request succeeds, or all requests fail.
Installation
go get github.com/daishisystems/fallback
Sample Code
First, we need to establish some data structures:
    // BasicResponse represents the response issued from the first successful
    // HTTP request, if applicable.
    type BasicResponse struct {
        Text   string
        Detail string
    }

    // BasicError represents the error issued from the last unsuccessful
    // HTTP request, if applicable.
    type BasicError struct {
        Code    int
        Message string
    }

    //
    type PostBody struct {
        Name   string
        Amount int
    }

    basicResponse := &BasicResponse{}
    basicError := &BasicError{}

    postBody := PostBody{
        "Random", 100,
    }
Next, we initialise a ConnectionManager (the Director in our Builder implementation) and pass a ConnectionBuilder (the Builder itself). This particular ConnectionBuilder, in this example, is designed to execute successfully:
    passPath := "http://demo7227109.mockable.io/get-basic"
    failPath2 := "http://demo7227109.mockable.io/fail-basic"
    failPath1 := "http://demo7227109.mockable.io/fail-basic-post"

    connectionManager := fallback.ConnectionManager{}

    // This Connection will execute last, and will succeed.
    passBuilder := fallback.NewConnectionBuilder("PASS", "GET", passPath, true,
        nil, nil, &basicResponse, &basicError, nil)
    connectionManager.CreateConnection(passBuilder)
Now add 2 more ConnectionBuilders to the chain, both of which, in this example, are designed to fail execution:
    // This Connection will be the 2nd Connection to execute, and will fail.
    failBuilder2 := fallback.NewConnectionBuilder("FAIL2", "POST", failPath2,
        true, nil, nil, &basicResponse, &basicError, passBuilder.Connection)
    connectionManager.CreateConnection(failBuilder2)

    //This Connection will be the 1st Connection to execute, and will fail.
    failBuilder1 := fallback.NewConnectionBuilder("FAIL1", "POST", failPath1,
        true, postBody, nil, &basicResponse, &basicError,
        failBuilder2.Connection)
    connectionManager.CreateConnection(failBuilder1)
Finally, invoke the first ConnectionBuilder in the chain. In this example, both first and second ConnectionBuilders are designed to fail. Execution recursively falls back to passBuilder, which executes successfully:
    // Each Connection will be invoked in a recursive manner until a
    // Connection succeeds, or all Connections fail. Please refer to the Chain
    // of Responsibility design for more information.
    statusCode, err := failBuilder1.Connection.ExecuteHTTPRequest()
    if err != nil {
        panic(err)
    }

    fmt.Printf("HTTP status code: %d\n", statusCode)
    fmt.Printf("Text: %s\n", basicResponse.Text)
    fmt.Printf("Detail: %s", basicResponse.Detail)
The fall-back process is encapsulated within package fallback; consuming clients are unaware of failures, and instead, are guaranteed success, long as at least one HTTP connection remains viable.
Summary
Package fallback enhances the durability of your API by automatically recovering from connectivity failure. It achieves this by providing an enhanced degree of redundancy to HTTP requests, introducing a Chain of Responsibility, consisting of a series of fallback HTTP requests designed to augment an initial HTTP request. Should the initial HTTP request fail, the next fallback HTTP request in the chain will execute.
Any number of fallback HTTP requests can be chained sequentially. Redundancy is achieved by executing each fallback HTTP request in a recursive manner until one of the requests succeeds, or all requests fail.
Connect with me:


