Monthly Archives: November 2014

JSON# – Tutorial #2: Serialising Simple Objects

Fork on Github
Download the Nuget package

The last tutorial focused on parsing embedded JSON objects. This time, we’ll focus on serialising simple objects in C#.

Object serialisation using JSON# is 25 times to several hundred times faster than serialisation using JSON.NET, on a quad-core CPU with 16GB RAM. The source code is written in a BDD-manner, and the associated BDD features contain performance tests that back up these figures.

Let’s start with a basic class in C#:

class SimpleObject {
    public string Name { get; set; }
    public int Count { get; set; }
}

Our first step is to provide serialisation metadata to JSON#. Traditionally, most frameworks use Reflection to achieve this. While this works very well, it requires the component to know specific assembly metadata that describes your object. This comes with a slight performance penalty.

Ideally, when leveraging Reflection, the optimal design is a solution that reads an object’s assembly metadata once, and caches the result for the duration of the application’s run-time. This is generally not achievable with stateless HTTP calls. Using Reflection, we will likely query the object’s assembly during each HTTP request when serialising or de-serialising an object, suffering the associated performance-overhead for each request.

JSON# allows us to avoid that overhead by exposing serialisation metadata in the class itself:

class SimpleObject : IHaveSerialisableProperties {
    public string Name { get; set; }
    public int Count { get; set; }

    public virtual SerialisableProperties GetSerializableProperties() {
        return new SerialisableProperties("simpleObject", 
        new List<JsonProperty> {
            new StringJsonProperty {
                Key = "name",
                Value = Name
            },
            new NumericJsonProperty {
                Key = "count",
                Value = Count
            }
        });
    }
}

First, we need to implement the IHaveSerialisableProperties interface, allowing JSON# to serialise our object. Notice the new method, GetSerializableProperties, that returns a SerialisableProperties object, which looks like this:

public class SerialisableProperties {
   public string ObjectName { get; set; }
       public IEnumerable<JsonProperty> Properties { get; private set; }
       public IEnumerable<JsonSerialisor> Serialisors { get; set; }

       public SerialisableProperties(IEnumerable<JsonProperty> properties) {
           Properties = properties;
       }

       public SerialisableProperties(IEnumerable<JsonSerialisor> serialisors) {
           Serialisors = serialisors;
       }

       public SerialisableProperties(string objectName,
           IEnumerable<JsonProperty> properties) : this(properties) {
           ObjectName = objectName;
       }

       public SerialisableProperties(string objectName,
           IEnumerable<JsonSerialisor> serialisors) : this(serialisors) {
           ObjectName = objectName;
       }

       public SerialisableProperties(IEnumerable<JsonProperty> properties,
            IEnumerable<JsonSerialisor> serialisors) : this(properties) {
            Serialisors = serialisors;
        }

        public SerialisableProperties(string objectName,
            IEnumerable<JsonProperty> properties, IEnumerable<JsonSerialisor> serialisors)
            : this(properties, serialisors) {
            ObjectName = objectName;
        }
    }
}

This object is essentially a mapper that outlines how an object should be serialised. Simple types are stored in the Properties property, while more complex types are retrieved through custom JsonSerialisor objects, which I will discuss in the next tutorial. The following code outlines the process involved in serialising a SimpleObject instance:

First, we initialise our object

    var simpleObject = new SimpleObject {Name = "Simple Object", Count = 10};

Now initialise a BinaryWriter, setting the appropriate Encoding. This will be used to build the object’s JSON-representation, under-the-hood.

var writer = new BinaryWriter(new MemoryStream(), new UTF8Encoding(false));

Now we use our Json library to serialise the object

var serialisableProperties = simpleObject.GetSerializableProperties();
byte[] serialisedObject;

using (var serialisor = new StandardJsonSerialisationStrategy(writer)) {
    Json.Serialise(serialisor, new JsonPropertiesSerialisor(serialisableProperties));
    serialisedObject = serialisor.SerialisedObject;
}

Below is the complete code-listing:

var simpleObject = new SimpleObject {Name = "Simple Object", Count = 10};

var writer = new BinaryWriter(new MemoryStream(), new UTF8Encoding(false));
var serialisableProperties = simpleObject.GetSerializableProperties();

byte[] serialisedObject;

using (var serialisor = new StandardJsonSerialisationStrategy(writer)) {
    Json.Serialise(serialisor, new JsonPropertiesSerialisor(serialisableProperties));
    serialisedObject = serialisor.SerialisedObject;
}

Now our serialisedObject variable contains a JSON-serialised representation of our SimpleObject instance, as an array of raw bytes. We’ve achieved this without Reflection, by implementing a simple interface, IHaveSerialisableProperties in our SimpleObject class, and have avoided potentially significant performance-overhead; while a single scenario involving reflection might involve very little performance-overhead, consider a web application under heavy load, leveraging Reflection. We can undoubtedly support more concurrent users per application tier if we avoid Reflection. JSON# allows us to do just that.

In the next tutorial, I’ll discuss serialising complex objects.

Connect with me:

RSSGitHubTwitter
LinkedInYouTubeGoogle+

JSON# – Tutorial #1: Returning Embedded-Objects

Fork on Github
Download the Nuget package

I’ve previously blogged about the premise behind JSON#. For a full explanation of the theory behind the code, check out this post.

Now, let’s dive into an example…

Let’s say that we have a JSON object that represents a real-world object, like a classroom full of students. It might look something like this:

{
    "classroom": {
        "teachers": [
            {
                "name": "Pablo",
                "age": 33
            },
            {
                "name": "John",
                "age": 28
            }
        ],
        "blackboard": {
            "madeOf": "wood",
            "height": "100",
            "width": "500"
        }
    }
}

This doesn’t look like it presents any great challenge to parse on any platform. But what if we expand it further to describe a school:

{
    "school": {
        "classrooms": [
            {
                "name": "Room #1",
                "teachers": [
                    {
                        "name": "Pablo",
                        "age": 33
                    },
                    {
                        "name": "John",
                        "age": 28
                    }
                ],
                "blackboard": {
                    "madeOf": "wood",
                    "height": "100",
                    "width": "500"
                }
            },
            {
                "name": "Room #2",
                "teachers": [
                    {
                        "name": "David",
                        "age": 33
                    },
                    {
                        "name": "Mary",
                        "age": 28
                    }
                ],
                "blackboard": {
                    "madeOf": "metal",
                    "height": "200",
                    "width": "600"
                }
            }
        ]
    }
}

Notice that our school object contains 2 classrooms, each of which contain similar objects, such as “blackboard”. Imagine that our school object needs to represent every school in the country. For argument’s sake, let’s say that we need to retrieve details about the blackboard in every classroom of every school. How would we go about that?

Well, we could refer to one of numerous JSON-parsing tools available. But how do these tools actually operate? Firstly, our massive JSON object will likely end up a large object. I’ve mentioned in previous blogs that objects greater than 85KB can significantly impact performance. So, immediately we’re potentially in trouble.

We can always cache the JSON object as a Stream, and read from it byte-by-byte. Tools like JSON.net offer capabilities like this, using components such as the JsonTextReader. So we’ve overcome the performance overhead associated with storing big strings in memory. But now we have another problem – we’re drilling into a massive JSON file, and searching for metadata that’s spread widely. We’re going to have to implement a lot of logic in order to draw the “blackboard” objects out.

What if requirements change, and we no longer need the “blackboard” objects? Now we just need the height of each blackboard. Well, we’ll have to throw out a lot of code, which is essentially wasted effort. Requirements change again, and we no longer need “blackboard” objects at all – now we need “teacher” objects. We need to rewrite all of our logic. Not the most flexible solution.

Let’s do this instead:

First, download the JSON# library from Github (MIT license).

Now let’s get those “blackboard” objects:

    const string schoolMetadata = @"{ "school": {...";
    var jsonParser = new JsonObjectParser();

    using (var stream = new MemoryStream(Encoding.UTF8.GetBytes(schoolMetadata))) {
        Json.Parse(jsonParser, stream, "blackboard");
    }

This will return all “blackboard” objects from the JSON file. Let’s say that our requirements change. Now we need all “teacher” objects instead. Simply change the code as follows:

    const string schoolMetadata = @"{ "school": {...";
    var jsonParser = new JsonObjectParser();

    using (var stream = new MemoryStream(Encoding.UTF8.GetBytes(schoolMetadata))) {
        Json.Parse(jsonParser, stream, "teachers");
    }

Such a change would have required significant effort, had we implemented our own custom logic using JSON.net’s JsonTextReader, or a similar component. Using JSON#, we achieve this by changing a single word. Now we’ve:

  • Optimised performance
  • Reduced our application’s memory-footprint
  • Avoided the Large Object Heap
  • Reduced development-time

The next tutorial outlines how to serialise objects using JSON#.

Connect with me:

RSSGitHubTwitter
LinkedInYouTubeGoogle+

Load Balancing a RabbitMQ Cluster

The Problem

Given a cluster of RabbitMQ nodes, we want to achieve effective load-balancing.

The Solution

First, let’s look at the feature at the core of RabbitMQ – the Queue itself.
RabbitMQ Queues are singular structures that do not exist on more than one Node. Let’s say that you have a load-balanced, HA (Highly Available) RabbitMQ cluster as follows:

RabbitMQ Cluster with Load Balancer

RabbitMQ Cluster with Load Balancer

Nodes 1 – 3 are replicated across each other, so that snapshots of all HA-compliant Queues are synchronised across each node. Suppose that we log onto the RabbitMQ Admin Console and create a new HA-configured Queue. Our Load Balancer is configured in a Round Robin manner, and in this instance, we are directed to Node #2, for argument’s sake. Our new Queue is created on Node #2. Note: it is possible to explicitly choose the node that you would like your Queue to reside on, but let’s ignore that for the purpose of this example.

Now our new Queue, “NewQueue”, exists on Node #2. Our HA policy kicks in, and the Queue is replicated across all nodes. We start adding messages to the Queue, and those messages are also replicated across each node. Essentially, a snapshot of the Queue is taken, and this snapshot is replicated across each node after a non-determinable period of time has elapsed (it actually occurs as an asynchronous background task, when the Queue’s state changes).

We may look at this from an intuitive perspective and conclude that each node now contains an instance of our new Queue. Thus, when we connect to RabbitMQ, targeting “NewQueue”, and are directed to an appropriate node by our Load Balancer, we might assume that we are connected to the instance of “NewQueue” residing on that node. This is not the case.

I mentioned that a RabbitMQ Queue is a singular structure. It exists only on the node that it was created, regardless of HA policy. A Queue is always its own master, and consists of 0…N slaves. Based on the above example, “NewQueue” on Node #2 is the Master-Queue, because this is the node on which the Queue was created. It contains 2 Slave-Queues – it’s counterparts on nodes #1 and #3. Let’s assume that Node #2 dies, for whatever reason; let’s say that the entire server is down. Here’s what will happen to “NewQueue”.

  1. Node #2 does not return a heartbeat, and is considered de-clustered
  2. The “NewQueue” master Queue is no longer available (it died with Node #2)
  3. RabbitMQ promotes the “NewQueue” slave instance on either Node #1 or #3 to master

This is standard HA behaviour in RabbitMQ. Let’s look at the default scenario now, where all 3 nodes are alive and well, and the “NewQueue” instance on Node #2 is still master.

  1. We connect to RabbitMQ, targeting “NewQueue”
  2. Our Load Balancer determines an appropriate Node, based on round robin
  3. We are directed to an appropriate node (let’s say, Node #3)
  4. RabbitMQ determines that the “NewQueue” master node is on Node #2
  5. RabbitMQ redirects us to Node #2
  6. We are successfully connected to the master instance of “NewQueue”

Despite the fact that our Queues are replicated across each HA node, there is only one available instance of each Queue, and it resides on the node on which it was created, or in the case of failure, the instance that is promoted to master. RabbitMQ is conveniently routing us to that node in this case:

RabbitMQ Cluster Exhibiting Extra Network-hop

RabbitMQ Cluster Exhibiting Extra Network-hop

Unfortunately for us, this means that we suffer an extra, unnecessary network hop in order to reach our intended Queue. This may not seem a major issue, but consider that in the above example, with 3 nodes and an evenly-balanced Load Balancer, we are going to incur that extra network hop on approximately 66% of requests. Only one in every three requests (assuming that in any grouping of three unique requests we are directed to a different node) will result in our request being directed to the correct node.

“Does this mean that we can’t implement round robin load-balancing?”
“No, but if we do, it will result in a less than optimal solution.”
“So, what’s the alternative?”

Well, in order to ensure that each request is routed to the correct node, we have two choices:

  • Explicitly connect to the node on which the target Queue resides
  • Spread Queues evenly as possible across nodes

Both solutions immediately introduce problems. In the first instance, our client application must be aware of all nodes in our RabbitMQ cluster, and must also know where each master Queue resides. If a Node goes down, how will our application know? Not to mention that this design breaks the Single Responsibility principle, and increases the level of coupling in the application.

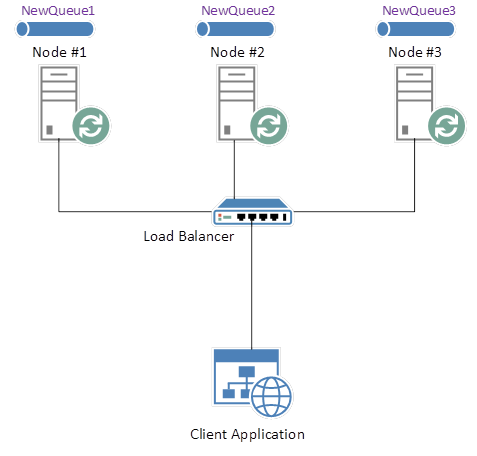
The second solution offers a design in which our Queues are not linked to single nodes. Based on our “NewQueue” example, we would not simply instantiate a new Queue on a single node. Instead, in a 3-node scenario, we might instantiate 3 Queues; “NewQueue1”, “NewQueue2” and “NewQueue3”, where each Queue is instantiated on a separate node.

The second solution offers a design in which our Queues are not linked to single Nodes. Based on our “NewQueue” example, we would not simply instantiate a new Queue on a single Node. Instead, in a 3-node scenario, we might instantiate 3 Queues; “NewQueue1”, “NewQueue2” and “NewQueue3”, where each Queue is instantiated on a separate Node:

RabbitMQ Cluster with Separate Queues

RabbitMQ Cluster with Separate Queues


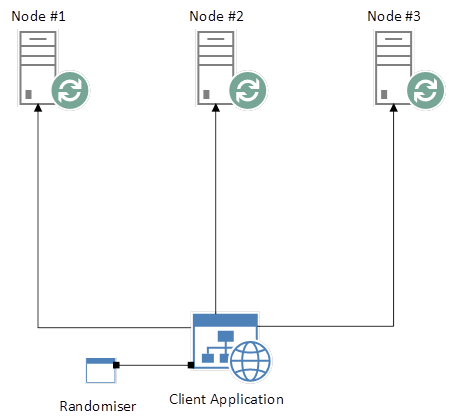
Our client application can now implement, for example, a simple randomising function that selects one of the above Queues and explicitly connects to it. In a web-based application, given 3 separate HTTP requests, each request would target one of the above Queues, and no Queue would feature more than once across all 3 requests. Now we’ve achieved a reasonable balance of load across our cluster, without the use of a traditional Load Balancer.
RabbitMQ Cluster with Randomiser

RabbitMQ Cluster with Randomiser


But we’re still faced with the same problem; our client application needs to know where our Queues reside. So let’s look at advancing the solution further, so that we can avoid this shortcoming.

Firstly, we need to provide mapping metadata that describes our RabbitMQ infrastructure. Specifically, where Queues reside. This should be a resilient data-source such as a database or cache, as opposed to something like a flat file, because multiple sources (2, at least) may access this data concurrently.

Now introduce an always-on service that polls RabbitMQ, determining whether or not nodes are alive. New Queues should also be registered with this service, and it should keep an up-to-date registry, providing metadata about Nodes and their Queues:

RabbitMQ Cluster with Monitor Service

RabbitMQ Cluster with Monitor Service


Our client application, on initial load, should poll this service and retrieve RabbitMQ metadata, which should then be retained for incoming requests. Should a request fail due to the fact that a Node becomes compromised, the client application can poll the Queue Metadata Store, return up-to-date RabbitMQ metadata, and re-route the message to a working Node.

This approach is a design that I’ve had some success with. From a conceptual point-of-view, it forms a small section of an overall Microservice Architecture, which I’ll talk about in a future post.

Connect with me:

RSSGitHubTwitter
LinkedInYouTubeGoogle+

RabbitMQ QOS vs. Competing Consumers

I recently answered a question on stackoverflow that revolved around this argument:
“Should I scale out my AMQP consumers, tweak the QOS values, or both?”
This is a broad question. The first thing to consider is the actual business process that facilitated by AMQP. Is your business process time-sensitive? For example, let’s say that you have a process which persist data to a database. How important from a business perspective is it that this data is saved immediately?

Quality of Service (QOS)

AMQP Channels contain a property called QOS. The value of this property determines the manner in which AMQP Consumers read messages from Queues. A QOS value of “1” ensures that only a single message at a time will be de-queued. The next message will not be processed until the current message has been handled. Consider the implications of this. Given a Queue that contains 5 messages, and a Consumer, with QOS set to “1”, that reads from that Queue, message #5 will not be processed until messages 1 – 4 have been de-queued and processed:

AMQP Queue with 5 Messages

AMQP Queue with 5 Messages

If it takes 200ms to process each message, then M5 will not be completely processed for 1 second. This figure will rise exponentially as the Queue grows in length. If a Publisher, or set of Publishers suddenly load 1,000 messages onto the Queue, our Consumer’s processing time now becomes minutes, let alone seconds.

Single AMQP Consumer

Single AMQP Consumer

So let’s increase our QOS value to “5”. Now our Consumer reads from the Queue at a rate of 5 messages at a time. Our Queue is now empty. But what’s happening at the Consumer? The Consumer manages its own Shared Queue in memory. This Shared Queue is a local representation of an AMQP Queue. When a Consumer de-queues a message, that message is cached in the Consumer’s Shared Queue, and processed accordingly.

Based on the above example, our Consumer’s Shared Queue now contains messages 1 – 5, and our actual AMQP Queue is empty. This offers a win; remember that our goal with RabbitMQ, and AMQP in general, is to keep our Queues empty, or near as possible, at any given time to reduce resource consumption. In this case, our Queue is empty.

Well, we’ve reduced RabbitMQ’s resource-footprint, but what’s the catch? Well, we’re still faced with the same problem, which is that our messages are processed sequentially, so we haven’t reduced the overall time that it takes to process the messages – we’ve just moved the problem from one context to another.

Competing Consumers

If we could process each message in parallel, then we could reduce or processing time. We can achieve this by adding multiple Consumers. Each message takes 200ms for a single Consumer to process, so 5 Consumers can process 5 messages in 200ms.

Multiple AMQP Consumers

Multiple AMQP Consumers

Actually, this won’t happen, or at least is not likely to happen, because we’ve left our QOS-value at “5”, so let’s follow the process flow, assuming that we’ve started each Consumer in order of 1 through 5. This is important because in situations where multiple Consumers are listening to a Queue, RabbitMQ will prioritise delivery of messages in the same order that the Consumers started listening. If Consumer #1 was the first Consumer to start, it will be the first to receive messages.

This is the problem, in our case. Remember, a QOS value of “5” means that the Consumer will read 5 messages at a time. So in this case, assuming that our Queue contains 5 messages, Consumer #1 will read all 5 messages, and process them sequentially. Consumer’s 2 – 5 will remain idle and wasted.

Our problem is now that our Consumers are not adequately balanced. To facilitate accurate round-robin style balancing among Consumers, we simply set the QOS value of each Consumer to “1”. This results in the following behaviour:

  • Each Consumer reads 1 message at a time
  • Older Consumers will receive messages first, assuming that they are not busy

Summary

We’ve reduced our overall processing time to 200MS. We can now process 5 messages in 200MS. So why not do this all the time? There are 2 answers to this. The first concerns the technical aspect of the design. Consider that running multiple Consumers costs resources, especially memory. Just remember this before you think about creating thousands of Consumers. The above problem is simplistic, but this design may not suit your infrastructure for real-world problems.

The second answer concerns the business needs of the actual process that we are managing. Let’s say that our process is a data-logging mechanism, and that our messages contain logging metadata. In this case, we may not care whether or not it takes several minutes to save this data. Logging data is rarely referenced until something goes wrong, so our initial single Consumer solution may be adequate. Now consider a business process that persists time-sensitive metadata to a database. In this case, our multiple Consumer solution may better suit our needs.

What if 1 second is an acceptable processing time? Then we can use a combination of both solutions. We can introduce multiple Consumers, and set their QOS values to “5”. The result is that no Consumer will ever process more than 5 messages at a time, and therefore won’t take more than 1 second to process. Assuming that we introduce 5 Consumers, we can process 25 messages per second. Why not just use 5 Consumers with a QOS value of “1”? Won’t this achieve the same result – 25 messages per second? Yes, or at least close enough, but likely not exactly, because there is more network traffic involved, as we’re now reading 25 messages individually as opposed to 25 messages in batches of 5.

It is critical to take into account the underlying business process when considering an AMQP solution. Generally, a one-size-fits-all approach for all business processes is too broad an approach.

Connect with me:

RSSGitHubTwitter
LinkedInYouTubeGoogle+